I wanted to install mailarchiva on my ubuntu box but i don't want to permanent mount the folder to my ubuntu box as i just need it to access some file during the setup.
here are the command to temp mount the folder to your ubuntu box
1) make a dir , i choose to do in mnt as easier to remember
mkdir /mnt/setupfile
2) let start to mount the file from window share to my ubuntu box
sudo mount -t cifs //win_share_location/folder /mnt/setupfile -o user=username,domain=domain,pass=password
done ! :)
once you are done and wish to un-mount the folder just type
sudo umount /mnt/setupfile
Wednesday, November 21, 2012
sudoers in ubuntu
For linux beginner like me i found it is kinda hard when working on a non-gui enviroment. I've created a new user in my ubuntu box for mail-archiva. When i try to sudo and it return with the error message "not in sudoers list". It does give me a headache to switch account back and forth.
that should do the trick :)
Here are the simple fix (the text in bold is command line) :-
1) groups <username> ; to check the group that the user account are currently associated with.
2) sudo adduser <username> sudo ; to add the new user to the sudo group
that should do the trick :)
Monday, March 12, 2012
Avaya : Forwarding Line / Call
When I first join my current workplace and I've been indirect assign to take over the Avaya system.
Asking for vendor to help is quite slow as you need to send out an email and wait for them to assign for an engineer.
Base on what I've learn from the engineer, hope this simple tutorial can ease your daily task.
Requirement :
1) Avaya Site Administration (software)
2) Admin ID & Password for the Avaya System
From my point of view how this Avaya system work are :-
Extension A (for e.g. 333) to forward the call when no pickup you'll need to assign a Coverage Path
When you type in display station xxx (xxx = ext number) , you able to check the station are assign to which coverage path.
I suggest you check the coverage path does it share with others station before you make any changes.
Type list coverage path to get a list of coverage path.

Once you have selected the coverage path you wanted to use; type in change station xxx (change = edit, display = view)
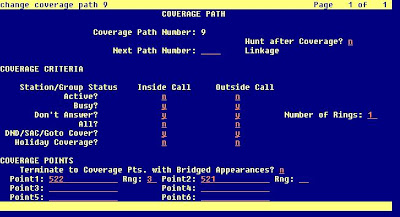
for this example, Number of Rings denote action take after number of rings;
After 1 rings if not answer it will forward the call to Point 1 for X number of ring and it will end the transfer at the last point of your entry. From the example, the call will be terminated if there is still no answer from Point 2.
From my example :-
Station A forward to Station B to Station C. If there is a call to Station B it will not forward to Station C as the call forwarding are base on the coverage path. Unless you share the same coverage else each have their own settings.
Asking for vendor to help is quite slow as you need to send out an email and wait for them to assign for an engineer.
Base on what I've learn from the engineer, hope this simple tutorial can ease your daily task.
Requirement :
1) Avaya Site Administration (software)
2) Admin ID & Password for the Avaya System
From my point of view how this Avaya system work are :-
Extension A (for e.g. 333) to forward the call when no pickup you'll need to assign a Coverage Path
When you type in display station xxx (xxx = ext number) , you able to check the station are assign to which coverage path.
I suggest you check the coverage path does it share with others station before you make any changes.
Type list coverage path to get a list of coverage path.

On the left are the coverage path number, you may add a new coverage path by type in add coverage path
Once you have selected the coverage path you wanted to use; type in change station xxx (change = edit, display = view)
change the coverage path number to the one you have selected / wish to modify
Type change coverage path x (x = path number)
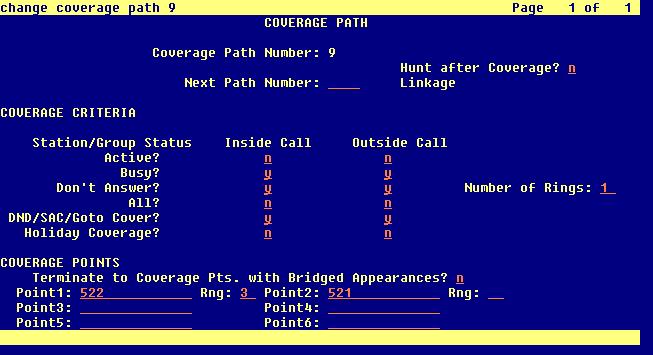
After 1 rings if not answer it will forward the call to Point 1 for X number of ring and it will end the transfer at the last point of your entry. From the example, the call will be terminated if there is still no answer from Point 2.
From my example :-
Station A forward to Station B to Station C. If there is a call to Station B it will not forward to Station C as the call forwarding are base on the coverage path. Unless you share the same coverage else each have their own settings.
Thursday, December 22, 2011
3G / WCDMA Network Only in Android
I've been desperately wanted to have my phone to just stay in 3G only network as the GPRS(1.x)/EDGE network in my hometown is pretty slow. Even the signal is weak but it is way faster than the 1.x / EDGE network.
To my suprise there is no such setting in my stock Nexus S (4.0.3). Thanks to the comunity after few googling around i found there is this hidden setting that allow your phone to select to use WCDMA network only as currently it is been set as WCDMA (preferred)
Dial *#*#4636#*#* and It will bring you to Testing Screen, for ICS you can click on Phone Setting and change the network to WCDMA only to fix your phone to use only 3G network.

Not able to make Screen Shot with the full text ( *#*#4636#*#* ) as it will auto go to the Testing Screen when you hit the last input.

The setting available to for the network selection.
Saturday, December 17, 2011
Android 4.0 - Ice Cream Sandwich for Nexus S

Saw this update from Android Google+ , it really make my day ! I've check on my i9023 to see is there any update available sadly there are none. Well it doesn't matter as long as I know there is ICS update roll out for the Nexus S,
Google Nexus S have updated their help page with user guide for Android 4.0 and a guide on for user upgrading from Android 2.3
UPDATE :-
There is a guide in androidcentral.com on how to manual download the OTA from Google
Update 4.0.3 ( http://android.clients.google.com/packages/ota/google_crespo/VQ8PQk_V.zip)
I've personally tested it on Nexus S i9023, it work like a charm :)
1) Just download the zip file and rename it to update.zip
2) Copy the file to your Nexus S USB storage
3) Power Off the phone. Power On back the phone while holding the Volume UP
4) You'll see the Bootloader screen, use the volume key to navigate around, choose Recovery and press the power button to confirm
5) Once you see the Triangle press the volume up; you'll be prompt with a recovery menu
6) Select the option Update from SD card, select the update.zip and press the power button to begin !
7) Once done you can reboot the system and you'll see the new ICS boot animation !
Friday, December 16, 2011
U Mobile - Facebook Deal !
U Mobile offering deal on their Facebook Page :- http://www.facebook.com/umobilesb
RM 254.00 for 6 months of U68 plan (5gb) + usb modem ! , quite a steal isn't it !
The deal is quite good and seems like require another 20 to have this deal on :P
RM 254.00 for 6 months of U68 plan (5gb) + usb modem ! , quite a steal isn't it !
The deal is quite good and seems like require another 20 to have this deal on :P
 |
| https://apps.facebook.com/like-the-deals/index.php |
Subscribe to:
Posts (Atom)